Pages

Showing posts with label nut free. Show all posts

Wednesday, July 6, 2016

Lazy John: A New Twist on an Old Favorite

Ever since being on this diet, one of the things I miss most is being able to eat Southern food.  I know that it's incredibly unhealthy, and I'm doing myself a favor by not eating all of that fat and grease, but there's a little piece of the South in me that just refuses to be silenced by food allergies.  I can't really blame it either because Southerners make incredibly amazing food. I have yet to find a restaurant in Utah that makes descent Southern food, and even if I did, I would have to have a mommy's night out because all menu items would be off limits to my food allergy toddler.  One of my favorite Southern foods (and thankfully one that isn't food allergy banned) is collard greens, and not just any collard greens; Southern collard greens.  Try as I might,  I can't make them like Q's BBQ or the dining hall at the University of Richmond, but this recipe is my attempt to do it anyway.  I also found out that my daughter loves collard greens.  Yup, you read that right.  My three year old LOVES collard greens, so this recipe was an instant hit at our house.

My original idea for this recipe was to wrap the Hoppin' John in the collard greens like a blanket.  The very nature of collard greens made that awkward and impossible, however, so I just made them up separate and threw them in my existing recipe for Hoppin' John just to see what would happen.  And it came out even better!  I'm seriously never going back. I have been converted to Lazy John for life!


Lazy John:

For the Collard Greens

Ingredients:

1-2 bunches collard greens
1 ham hock (optional)
1 Tablespoon sugar
1 teaspoon salt
1 Tablespoon apple cider vinegar
Broth or Water to cover (3-4 cups)

Stove Top Directions:


  1. Add water and ham hock (if using) to a large pot.  Heat until boiling.  Reduce heat, cover, and let simmer for an hour.  If not using the ham hock, start on step 2.
  2. Wash the collard greens and chop into bite-sized pieces.
  3. Add the collard greens and all remaining ingredients to the pot.  Add enough water or broth to cover.  Bring to a boil.  Reduce heat, cover, and let simmer for an hour or until they are tender.
  4. Drain the greens and set aside.
Crock Pot Directions:

I usually prefer this method since I can throw it in the crock pot in the morning and have it ready when I get home from work at night.  Simply just toss all the ingredients into the crock pot and cook 4-6 hours on high or 6-8 hours on low.  Drain the greens and set aside.


For the Hoppin' John


Ingredients:
3 slices bacon
1 clove garlic
1 green pepper
1/2 cup onion
1 Tablespoon pickled jalapeño (or fresh)
3 cups black eyed peas (2 cans)
1 cup black beans (1 can)
1/2 teaspoon oregano
1/2 teaspoon thyme
1/2- 1 teaspoon salt or to taste*
1 1/2 teaspoons maple syrup
1 cup mushrooms sliced
salt and pepper to taste 
Directions:
  1. In a large frying pan, cook the bacon until it is crispy.  Remove from the pan and set aside.
  2. Add the garlic, onion, pepper, jalapeño, oregano, thyme, salt, and maple syrup to the pan and sauté until tender.  I just use the bacon grease to sauté the veggies.  It really enhances the flavor of the whole dish.  However, if you are looking for a leaner option, you can just use a little olive oil. 
  3. Add the collard greens and mushrooms and continue sauteing until the mushrooms are soft stirring continually so as not to burn the greens.
  4. Add the beans and bacon and heat through.
*If you use canned beans, you may want to reduce the salt.


Friday, November 14, 2014

Creamy Italian Stuffed Summer Squash


Ok, so technically summer ended a while ago, but I had this HUGE squash from my mom's garden that needed to be eaten and I also had a craving for something Italian.  Plus it's never a bad thing to reminisce about how warm and cozy the world used to be before winter came along (For those of you who don't know, there are only two seasons in Utah, winter and summer).  The only problem; how does one make something Italian with no garlic, no onion, no tomatoes, no pasta, and no dairy?  Due to my daughter's allergies, pretty much every ingredient that makes Italian food amazing was out.  I also had to make the recipe corn free as if this wasn't going to be a big enough challenge on its own. 
I was determined to overcome this challenge, however, since I really want to have more meals that both taste good to me and agree with my daughter's allergies.  Currently the list of meals that meet both those requirements is quite short.

Despite it's lack of many things that make great Italian food, this stuffed squash doesn't disappoint.  I kept the ingredient list short so as not to overcomplicate things.  I was actually surprised by how much flavor I was able to pack into this dish with just a few ingredients.  It's savory, but not overwhelming, which makes it the perfect dish for someone who is sensitive to strong flavors or who has allergies to garlic and onions.  Unfortunately my daughter didn't care much for it, but I feel like it's progress nonetheless.   I wasn't sure if I could learn to cook without garlic and onions.  To be honest, most of my garlic and onion free recipes still come out tasting not quite right, but I now know that if I put some serious thought into it, I can make good things happen.


Creamy Italian Stuffed Summer Squash
 
Ingredients
 
½ cup uncooked millet
1 pound ground pork or chicken
½ Tablespoon red wine vinegar
¼ teaspoon salt
¼ teaspoon sugar
1 ½ teaspoons Italian Seasoning
1 large yellow squash or 2-3 small squash
1 cup mushrooms
1/3 cup non-dairy milk
1 Tablespoon Tahini
Salt to taste
Vegan Cheese (optional)
 
Directions
  1. Preheat the oven to 350.
  2. In a medium saucepan, roast the millet over medium heat until it begins to pop and turn golden brown.  Add 1 cup of water and bring to a boil.  Reduce the heat to low, cover, and let simmer for 30-40 minutes.  Try to resist the urge to lift the lid.  The millet will cook up fluffier if you leave it alone.  You can also add a little oil to the boiling water if you wish but it isn't absolutely necessary.
  3. While the millet is cooking, combine the pork, vinegar, salt, sugar, and Italian seasoning in a frying pan or skillet.  Cook over medium-high heat until the pork is cooked through.  Drain off any excess grease or liquid.
  4. Slice the squash in half lengthwise and hollow it out using a spoon or ice cream scoop.   Chop the squishy squash insides into smaller, bite-sized pieces and set aside.  Place the hollowed out squash shells on a baking sheet and set aside.
  5. Chop the mushrooms and add to the pork mixture along with the squash insides. Continue cooking until the squash and mushrooms are tender.
  6. Add the milk, tahini, and cooked millet to the pork mixture.  Cook a few more minutes until the liquid has thickened slightly.  Add salt to taste.
  7. Spoon the mixture into the hollowed out squash, lightly pack the mixture down as you go.  (I had a lot of extra filling so I piled it as high as I could without it falling all over the pan.)
  8. Sprinkle vegan cheese on top of the stuffed squash (if using).  I thought it tasted great both with and without the cheese.
  9. Bake for 25-30 minutes or until the squash is tender and the tops are slightly browned.  Serve with salad and bread if desired. 

Sunday, November 2, 2014

Kamut Graham Crackers

This recipe came about as sort of a necessity.  There is an Oh She Glows vegan pumpkin pie recipe with graham cracker crust that I've wanted to try for like a year now.  However, when you are a single mom with a 6 month old baby that has multiple food allergies, making such things becomes too much of a hassle.  Now I have a 16 month old who LOVES graham crackers and snacks in general.  In fact, she is getting to the point where she has to have snacks to get through the day.  Usually we just have dried fruit or Arrowhead Mills Kamut puffs, but those get old fast, even for a toddler.  Sometimes as a special treat we have plantain, potato, or lentil chips but those are expensive and are not very fulfilling as snacks.  My daughter is also in daycare now that school is back in session, which means she gets to watch all of the other kids have snacks while she has none.  It only seemed right to expand our snack repertoire. 

 I almost never make snacky stuff because it's all I can do to get breakfast, lunch, and dinner on the table, but when she got a hold of a wheat and corn filled graham cracker at daycare the other day, I figured what the heck; why not make some for her and have some for my vegan pumpkin pie recipe as an added bonus. Win, win!

This recipe worked out quite nicely with the Kamut flour and it's pretty easy to make.  I went from start to putting it in the oven in under 20 minutes which is another win since that's about how long I can keep my daughter from going into hysterics because I'm cooking and not giving all of my undivided attention to her.  It ends up being worth it though because these delightful crackers are 100% kid approved.   


These crackers are mildy sweet with a light, airy crunch and they are healthier than your traditional store bought graham crackers, which is yet another win.  I haven't tried it yet, but I'm sure they would also taste great with a glass of non-dairy milk or with some melted chocolate and marshmallows.  I can't wait to try them out on my pumpkin pie recipe.  I'll let you know how that goes.
 
Kamut Graham Crackers
 
Ingredients


½ Tablespoon ground flax seed meal
¼ cup coconut oil
2 Tablespoons maple syrup
2 Tablespoons non-dairy milk
1 ½ Tablespoons water

1 cup Kamut brand flour
3 Tablespoons sugar
¼ teaspoon salt
¼ + 1/8 teaspoon baking soda
½ teaspoon cinnamon
 
 
Directions

  1. Preheat the oven to 350 degrees. 
  2. In a small bowl, combine the flax seed meal, coconut oil, maple syrup, non-dairy milk, and water.  Let sit for a few minutes while the flax meal sets.
  3. In a medium sized bowl, combine the flour, sugar, salt, baking soda, and cinnamon.  Mix well.
  4. Add the wet ingredients to the dry ingredients and mix until there are no dry spots.  The dough should be slightly crumbly but should stick together if you mush it with your hands.
  5. Form the dough into a ball and place on a cookie sheet lined with parchment paper or aluminum foil (I didn't have much success with wax paper).
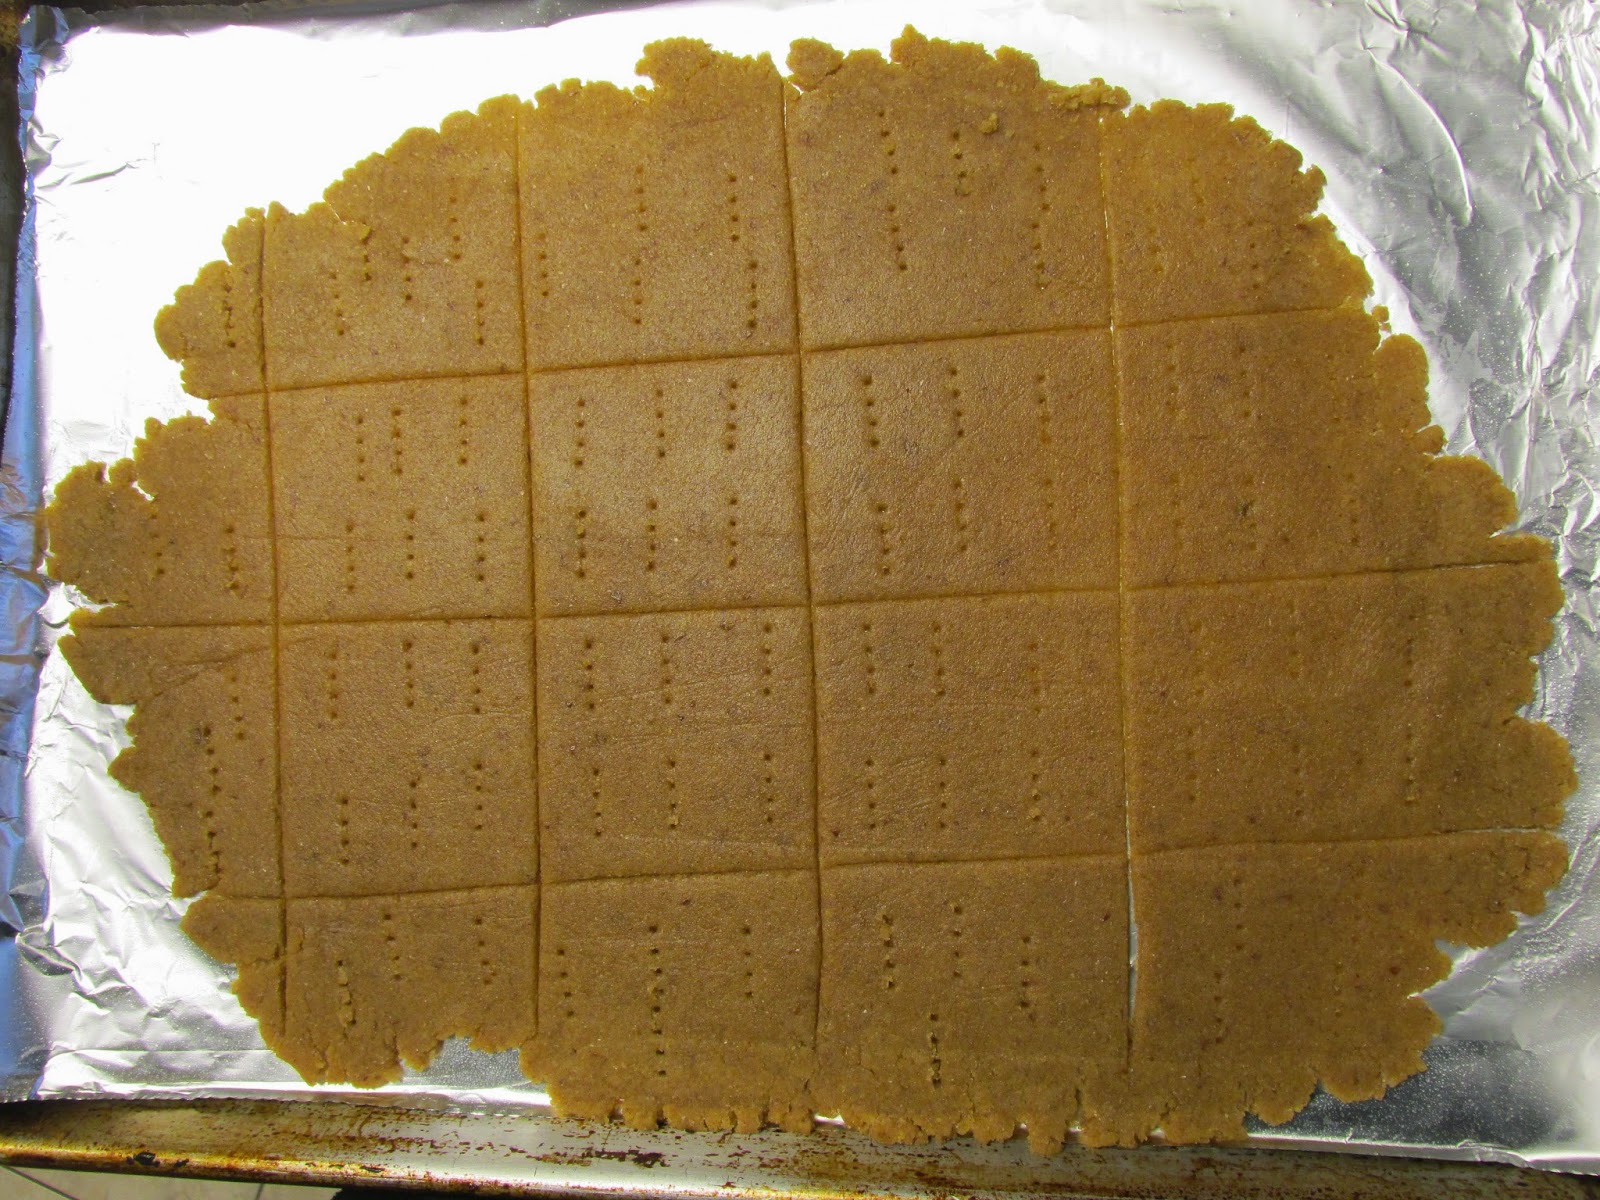
  6. Place another piece of parchment paper or saran wrap on top of the dough and roll the dough out until it is fairly thin (approximately 1/4- 1/8 of an inch).  The baking soda will make it puff up a bit so rolling it thinner will help make the crackers crunchier. 
  7. Cut the crackers into your desired size and shape using a pizza cutter, cookie cutter or pastry slicer and poke a few fork pricks into each cracker.
  8. Bake the crackers at 350 degrees for 15-20 minutes or until they are golden brown.  The crackers will be slightly spongy when you first pull them out of the oven but they will crisp up as they cool down.
  9. Store the crackers in an air-tight container or zip lock bag to keep them fresh.

Note: If you prefer not to use coconut oil you can sub another oil, preferably a light oil in its place.  You may need to make some adjustments to cooking time and wet to dry ratio, however, to get the same light crisp that the coconut oil provides.

Saturday, August 23, 2014

Grain Free Hoppin' John

I actually eat this stuff for breakfast.  The inspiration came from a few sources actually.  The first was my mother who suggested that I start thinking outside the box in terms of breakfast food.  Restrictions on eggs, grains, and dairy left me with few good, quick options in the morning.  This has bacon in it so it totally counts as breakfast.  The second inspiration came from my sort-of southern roots.  I've known about Hoppin' John since I was a kid.  I loved the American Girls series and my parents had gotten me some of the cookbooks for Christmas.  Traditionally it's made with rice, but since that wasn't an option, I decided to add more beans.... plus some veggies and spices.  After living in Virginia for 4 years and then going on an allergen friendly diet, I was actually craving some good old Southern cooking.  Unfortunately in the South, everything gets breaded, fried, dipped in cream, and smothered in butter.  While all of these things make Southern cooking the wonderful cuisine that it is, they are not on the approved allergy list.  That made Hoppin' John, a good option for a blog post.  Just a side note, I'm presently attempting to think up a recipe for fried chicken with Kamut flour and no dairy.  I'll let you know how that works out.  Until then, enjoy some grain-free Hoppin John for breakfast, or lunch, or dinner, or all three.  This dish is both easy to make and budget friendly so you can eat a lot of it and feel great about it because it's good for your body, and your pocketbook.


 Traditionally, Hoppin' John is made with rice.  If you would like to add rice feel free.  Just substitute any amount of beans for an equal amount of rice.  I also use pickled jalapeño.  It adds a great flavor to the dish, and it tends to be a little milder than fresh jalapeño.  It also keeps for long periods of time (we aren't big jalepeno eaters here).  However, I have used fresh jalapeño in a pinch and it came out great.

Grain Free Hoppin' John
Ingredients:
3 slices bacon
1 clove garlic
1 green pepper
1/2 cup onion
1 Tablespoon pickled jalapeño (or fresh)
3 cups black eyed peas (2 cans)
1 cup black beans (1 can)
1/2 teaspoon oregano
1/2 teaspoon thyme
1 teaspoon salt
1 1/2 teaspoons maple syrup
salt and pepper to taste 
Directions:
  1. In a large frying pan, cook the bacon until it is crispy.  Remove from the pan and set aside.
  2. Add the garlic, onion, pepper, jalapeño, oregany, thyme, salt, and maple syrup to the pan and sauté until tender.  I just use the bacon grease to sauté the veggies.  It really enhances the flavor of the whole dish.  However, if you are looking for a leaner option, you can just use a little olive oil. 
  3. Drain off the extra grease.
  4. Add the beans, and heat through.


Monday, August 4, 2014

Millet and Chia Seed Breakfast Porridge

When I found out that my daughter was allergic to basically every grain except for kamut, millet, teff, and amaranth, I was at a complete loss as to what I was going to do.  Grains make so many wonderful things, especially things that are easy to grab for a quick snack such as cereal, crackers or granola.  I had no idea what to do with ANY of these grains.  It's not like they make crackers made out of only teff or only kamut (although they really should).  After doing some research on kamut, it quickly became my grain of choice.  As a form of wheat, I could pretty much sub it in place of any recipe that called for wheat and have it come out ok.  Unfortunately it's a little dry, but it's organic and non-gmo so I really can't complain too much since gluten free cooking can be a bit more problematic.  That still didn't solve the problem of what to do with the other grains, however. Teff is good but incredibly dense, and I didn't care much for the amaranth.

When a colleague suggested that I use millet as a replacement for rice, I jumped at the opportunity to try it out.  One of the things I had been craving like crazy was my grandmother's rice pudding.  It was actually more of a custard than a pudding; creamy, melt-in-your-mouth, goodness.  Sadly, the three main ingredients were milk, eggs, and rice, all of which were forbidden foods.  I decided I'd try to make it anyway without the three main ingredients using millet instead of rice.  The end result (this recipe) was nothing like my grandmother's pudding, but it is still very tasty and has become one of my favorite breakfast foods.  I like to make a big batch of it so that I can eat it for a few days.  It's easy to fix and keeps fairly decent in the fridge, although you will need to add a little extra milk to it as millet also tends to dry out a bit.  Millet is also incredibly cheap which is also a plus. 
  
 
In addition to being a good replacement for rice, the cooking process is also similar.  The only difference is that millet comes out better when toasted first.

 
I think that soy milk gives this recipe the best flavor, but I have used other milks in a pinch and it tastes just fine.

 
Add some puréed banana (Believe me you don't want to skip this part... unless of course your are allergic to bananas).

 
Millet and Chia Seed Breakfast Porridge
 
Ingredients:
 
1cup millet
2 1/4 cups water
1 1/3 cup soy milk (or other non-dairy milk of choice)
1 Tablespoon Chia seeds
1 Tablespoon raw sugar (or sweetener of choice)
1/2 teaspoon cinnamon
1/2 teaspoon vanilla
1/3 cup raisins
1 banana
 
Directions
 
  1. In a saucepan, toast the millet over medium-high heat until it begins to turn golden and smell fragrant stirring frequently.  It will burn quickly so keep a close watch on it.
  2. Add the water and a drop of oil (optional) and bring to a boil.  Reduce heat to low, cover, and let simmer for 30-40 minutes.  Try to resist the urge to remove the lid as the millet will come out better if it is left covered.  Millet tends to be a bit crunchy so cook it longer if you want it a little softer.  Just don't overcook it or it will turn into mush.
  3. While the millet is cooking, heat 1 cup of the soy milk and the chia seeds over medium-high heat stirring continuously until it reaches a low boil.  Do not heat too hot or it will boil over.
  4. Add the sugar, cinnamon, vanilla, and raisins to the soy milk mixture.  Set aside.
  5. In a blender or food processor puree the banana and the remaining 1/3 cup of soy milk.
  6. Add the banana mixture to the soy milk mixture and stir well.
  7. Add the soy milk mixture to the millet and mix thoroughly.  If the porridge seems dry add a little extra milk until it reaches your desired consistency.
  8. Top with fresh fruit if desired.