Pages

Saturday, July 18, 2015

PB&J Banana Tot Dots

 
I've been meaning to post this for almost a year now, but time has a funny way of getting away from you, especially when you are trying to focus on being a mom, a 5th grade teacher, and a college student.  This idea actually came about while my daughter was going through a particularly difficult teething stage last summer.  There are all kinds of fantastic ideas out there for teething babies, but very few of them met all of the allergen requirements we needed.  My favorite treats were the frozen yogurt dots that are floating about on many blogs and recipe sites.  Of course those were out of the question due to her allergies.  Then I discovered vegan banana soft serve.  It's basically just frozen bananas and peanut butter (optional) blended up in a food processor and served cold.  It's really tasty, and really easy to make, and my daughter really likes bananas and peanut butter so it only made sense to use this to my advantage.  I decided to spice things up a bit and add jelly to the mix, and consequently ended up with a pretty amazing teething treat.  I would imagine you could pour this into a popsicle mold and have a treat for older kids as well, or you could just eat it straight out of the food processor.  I won't judge.


PB&J Banana Tot Dots
 
Ingredients
 
2 frozen bananas
2 Tablespoons peanut butter or other nut or seed butter of choice (Optional)
2 Tablespoons jelly or pureed fruit of choice (I used pureed blueberries)
 
Directions
 
  1. Line a baking sheet with wax or parchment paper
  2. Place all ingredients in a food processor and blend until smooth
  3. Place in a pastry bag or plastic bag with the corner cut off
  4. Dispense in small dots on the cookie sheet.  Remember that you are making them for a toddler, so you want them to be fairly small.
  5. Place the pan in the freezer. 
  6. Once the dots are completely frozen, you can move them from the pan into a separate container.  These melt VERY QUICKLY so I recommend using Tupperware lined with wax paper to separate them out in layers.  Otherwise, you will have a big gooey mess on your hands.   
 
*Notes: The bananas do not necessarily have to be frozen when you put them in the food processor.  However, they will be easier to work with if they are.  I found it very difficult to control the size of my dots with un-frozen bananas.  Also, because these melt so fast, you will only want to give a few at a time to your toddler.

Wednesday, July 15, 2015

Orange Creamsicle Smoothie


As a kid, one of my favorite summer treats was the infamous orange creamsicle; a delightful orange flavored shell with a creamy vanilla inside.  If I happened to be eating the Creamies brand of creamsicles, there was that fantasitc message written on the stick that told me to, "have another creamie," and of course I would.  I'd eat as many as my parents would allow in one sitting, which usually wasn't more than 2 (if I was lucky).  At some point, however, I lost my appetite for them.  Even before my crazy breastfeeding diet, that fake orange flavor with a whitewashed vanilla inside had stopped appealing to me.  Truth be told, frozen desserts in general had stopped appealing to me (with the exception of Ben and Jerry's).  I loved the idea of frozen orange and vanilla in a popsicle, but I preferred to have real orange and vanilla as opposed to something that had been chemically engineered to taste like it.  In fact, I forgot about orange creamsicles altogether until I was thumbing through a book by "The Blender Girl" and found her version of an orange creamsicle smoothie.  Of course I was intrigued by the idea of creating my own orange creamsicle, I just needed to create one that was allergy safe for my daughter.  I had recently used a vanilla bean to make nut milk for the first time (a truly marvelous addition to a household staple) and wanted to do something meaningful with the nut pulp (those vanilla beans are expensive).  Thus the orange creamsicle smoothie was born with real vanilla, real orange, and no cream.  While it didn't pass the 2 year old taste test of approval, it did bring back fond memories of chowing down on orange flavored Creamies and treating myself to another as per the request on the stick.  Only this time, I got to indulge guilt free with all the health benefits that real food has to offer.


Orange Creamsicle Smoothie
 
Ingredients
 
3/4 cup nuts soaked or nut pulp (I used macadamia)
1/2 a banana frozen
1 peach or apricot
1/2 cup mango frozen
1 Orange
1 1/4 cup orange juice
1/2 a vanilla bean (optional)
Sweetener of choice to taste (optional I didn't use any)
 
Directions
 
Place all ingredients into a blender and puree until smooth
 
* Note: If you are using soaked nuts instead of nut pulp, add the nuts, vanilla bean, and a portion of orange juice to the blender first and lightly blend before adding the other ingredients to ensure a smoother texture.


Sunday, June 7, 2015

A Guide to Living with a Corn Allergy FAQs

For a long time, I thought we were eating corn free, but my daughter's eczema said otherwise.  The chapped and peeling skin on her face, the scars and scratches all over her body from her constantly clawing at herself in a futile attempt to make the itching stop, and the late night screaming all pointed to dietary problems that I wasn't even aware we had.  Add in all of her other allergies, and it was a non-stop, round the clock problem that had me wishing I could become anorexic so that I wouldn't have to deal with it anymore.  While eating corn didn't physically affect me, it created a parenting nightmare in terms of taking care of my daughter that turned me off from food completely, especially corn. 
 
You'd think that having a corn allergy would have a simple enough solution; just stay away from corn.  While that works for other foods, it almost never works for corn.  Anyone who has to deal with a corn allergy will tell you that being allergic to corn is about the most complicated thing you will encounter in your life.  Even after all of my research and efforts I still wouldn't say that we eat corn free.  We are corn lite at best and to really be corn free would take and exuberant amount of time an money; something that I just don't have.  Thankfully we can get away with being corn lite.  I don't know what I'd do if we weren't that lucky.

FAQs About Corn Allergies
(My attempt to simplify a really complicated allergy)

What is a corn allergy?

A corn allergy is basically the same thing as any other allergy.  It is an immune response that occurs when corn or something made from corn comes in contact with the body.  Much like other allergies, the symptoms can range from bloating, itchy, watery eyes, to rash, fever, vomiting, and even anaphylactic shock.  Some corn allergic people also report symptoms such as migraines, depression, anxiety, hyperactivity, and other mental health problems as a result of being corned.

How do I know if I have a corn allergy?

A corn allergy can be identified similarly to other allergies via a blood and/or skin test.  My daughter's allergy was identified by a chiropractor who does muscle testing and laser treatments for allergies.  Some with a corn allergy report that their allergy could not be identified by medical testing, but that they tried eliminating corn and felt better as a result. 

Why is a corn allergy so difficult to manage?

The biggest reason why a corn allergy is so difficult to manage is because corn is literally in everything.  It's in almost all prepackaged foods in the form of corn derivatives and/or cross contamination.  It's fed to the livestock that provide us with meat, eggs, and dairy.  It's in the sprays and washes used on fresh produce.  It's in medical supplies and medications, including vaccines.  It's in soaps, household cleaners, plastics, latex, fabrics, toilet paper, disposable diapers,  and pretty much anything else you can think of.  It's even in the air we breathe due to the ethanol used in gasoline and the enormous amount of corn we have growing on farmland at any given location at any given time.

Another reason why a corn allergy is so hard to manage is because it's been processed and changed into dozens of different derivatives, many of which are synthetically, and chemically processed to add flavor, texture, and shelf life to food.  It's not uncommon for a person who is allergic to corn to be ok with eating one corn derivative while another one will send them to the hospital with a severe reaction.  Most corn allergic people have no idea which derivatives are safe for them to consume and which aren't so we all just make it a point to avoid them all.  The same goes for certain brands of things.  One person can consume one brand of something with no problems while another cannot.  Some people react to all corn and corn derivatives.  This makes it very hard to try new things or even eat a balanced diet at times since most people with a corn allergy also suffer from other allergies and health problems as well.

Lastly, living with a corn allergy is very costly.  The non-corn version of many foods is usually double the cost of their corn containing counterparts.  This further limits people with corn allergies because many are on a budget and cannot afford to make a lot of corn free items a staple.  In our house, we eat a lot of beans and potatoes because they are cheap.

How can I avoid corn?

Avoiding corn is not easy.  To be truly corn free is almost impossible and takes a lot of time, money, and dedication.  People who are really sensitive cannot shop at traditional grocery stores and must rely on either growing their own food or local (and sometimes not local) farmers to provide the rest.  However, there are some things you can do/ look for to help ensure that you are not getting corned.  Disclaimer: none of these suggestions ensures that your food will be corn free so be sure to read labels, do research, ask questions, and trial carefully.
  • Grow your own food:  The only way to ensure that your food comes from somewhere safe is to grow it yourself.  If you have the space and the means to do so, you can also raise your own livestock on a diet that is not corn based.  Most livestock is not biologically engineered to eat corn anyway (especially cows) so you will be doing the animals a favor.  Be wary of store bought soil, however, as some of it is corny.
  • Buy local:  Many local farmers do not use the pesticides and washes on their produce that commercial farmers do.  They also tend to raise their livestock on a corn free or corn lite diet.  Being able to talk to the farmer directly is hugely helpful since they can tell you exactly what they use on the farm and some may even be willing to work with your allergies even if they do use corn products.  Plus you will be buying local and helping the environment which is a total win.
  • Look for labeling that is organic, Non-GMO, kosher, and foods that are free of added flavors, preservatives, and colors:  While this does not guarantee that your food will be free of corn or cross-contamination with corn, it will save you a lot of label reading.  Please note that labels that say no added artificial flavors, colors or preservatives are often corny.  You want the food that has none of that.
  • Avoid food with ingredients that you don't know what they are: If it sounds like an element off of the periodic table you had to memorize in 9th grade science, it probably came from corn.  Most ingredients that you can't pronounce and have no idea what they are are chemically synthesized in a lab.  Even if they don't come from corn, they aren't the healthiest thing to be eating and you probably want to avoid it anyway.  Fake science experiment food doesn't sound appetizing after you start really looking at ingredient labels.  Trust me, you'll get it after you've been doing it a while.   
  • Be mindful of vegan and gluten free foods: Don't get me wrong.  There are tons of fantastic vegan and gluten free foods out there that are safe for corn allergic people.  However, once traditional ingredients such as meat, dairy, and wheat start coming out, the corn products start going in as a replacement.  Just be sure to carefully read the labels on these and trial with caution.
  • Look for short ingredient labels:  Ever wonder why a store bought loaf of bread has an ingredient label that's half a page long and sounds like it was written in a foreign language?  Because all those extra ingredients are corn added to enhance the flavor, shelf life, texture, and nutrient density of the bread.  When avoiding corn, the shorter the ingredient list, the better.  Look for ingredients that are similar to those that you would use if you made the item at home.  For example, a homemade loaf of bread only has a few ingredients, therefore, the loaf of bread you buy at the store should also only have a few ingredients (and you should be able to easily identify all of them).  
  • When in doubt, make your own: This is by far the most frustrating thing about this allergy.  Making your own everything is time consuming, expensive, and even with the best of intentions, you will sometimes still fail at it, especially if you are using new ingredients that you've never tried before.  However, it still remains the best way to ensure that your food is safe for you.  This also applies to soap and other household products.
Can I eat at restaurants?
As a general rule, restaurants are not a good idea.  Pretty much every chain restaurant has corn in their food and the staff will not know what they are looking for in terms of helping you find and check food labels.  That being said however, some corn lite people can occasionally eat out.  Here are some options that might work for you:
  • Salad Bars (you will want to bring your own dressing)
  • Baked potato bars
  • Farm to table restaurants
  • Small, locally owned restaurants where the food is made from scratch and the chef can make modifications for you.
  • Chain restaurants where you can order a plain salad, plain fruits and veggies, and plain meat.
Some of our favorite eat out places are Texas Roadhouse, the Cheesecake Factory, Mongolian Grills, and a small, local restaurant called Mollie and Ollie.

What about traveling?

Most corn allergic people pack and freeze their food and toiletries to take with them or ship in advance.  They try to stay in condos or hotels with kitchen access, and do a lot of research before they leave to ensure that they have a safe supply of water, emergency food, and toiletries.  Some of the restaurant suggestions mentioned above may also work for someone who is traveling.

How can I get corn free medication?

Corn free medication has to be compounded.  This can be tricky in the United States because you need both a prescription and a pharmacist who knows what they are doing.  Both of those can be hard to come by.  Compounded meds are usually not covered by insurance so it can also be expensive.  Most medication can be easily compounded but some cannot, including vaccines.  Talk to your healthcare provider to find something that will work for you.  You may need to speak to multiple healthcare providers since many are unfamiliar with the ingredients in medications.  Some herbal supplements are corn free and may work for you as well.  At our house, we usually go with the herbal supplements before we try other medications, but you should always do what works best for you.

Where can I get more information?
 
 
Corn Allergy Girl: A blog containing information about traveling, emergency room and medical advice, suggestions for possible safe products, and tips on everyday living with a corn allergy.
 
A list of corn free products (please note that even though these products do not have corn listed as an ingredient, they still might be cross contaminated with corn.  Do your research and trial carefully)


Friday, November 14, 2014

Creamy Italian Stuffed Summer Squash


Ok, so technically summer ended a while ago, but I had this HUGE squash from my mom's garden that needed to be eaten and I also had a craving for something Italian.  Plus it's never a bad thing to reminisce about how warm and cozy the world used to be before winter came along (For those of you who don't know, there are only two seasons in Utah, winter and summer).  The only problem; how does one make something Italian with no garlic, no onion, no tomatoes, no pasta, and no dairy?  Due to my daughter's allergies, pretty much every ingredient that makes Italian food amazing was out.  I also had to make the recipe corn free as if this wasn't going to be a big enough challenge on its own. 
I was determined to overcome this challenge, however, since I really want to have more meals that both taste good to me and agree with my daughter's allergies.  Currently the list of meals that meet both those requirements is quite short.

Despite it's lack of many things that make great Italian food, this stuffed squash doesn't disappoint.  I kept the ingredient list short so as not to overcomplicate things.  I was actually surprised by how much flavor I was able to pack into this dish with just a few ingredients.  It's savory, but not overwhelming, which makes it the perfect dish for someone who is sensitive to strong flavors or who has allergies to garlic and onions.  Unfortunately my daughter didn't care much for it, but I feel like it's progress nonetheless.   I wasn't sure if I could learn to cook without garlic and onions.  To be honest, most of my garlic and onion free recipes still come out tasting not quite right, but I now know that if I put some serious thought into it, I can make good things happen.


Creamy Italian Stuffed Summer Squash
 
Ingredients
 
½ cup uncooked millet
1 pound ground pork or chicken
½ Tablespoon red wine vinegar
¼ teaspoon salt
¼ teaspoon sugar
1 ½ teaspoons Italian Seasoning
1 large yellow squash or 2-3 small squash
1 cup mushrooms
1/3 cup non-dairy milk
1 Tablespoon Tahini
Salt to taste
Vegan Cheese (optional)
 
Directions
  1. Preheat the oven to 350.
  2. In a medium saucepan, roast the millet over medium heat until it begins to pop and turn golden brown.  Add 1 cup of water and bring to a boil.  Reduce the heat to low, cover, and let simmer for 30-40 minutes.  Try to resist the urge to lift the lid.  The millet will cook up fluffier if you leave it alone.  You can also add a little oil to the boiling water if you wish but it isn't absolutely necessary.
  3. While the millet is cooking, combine the pork, vinegar, salt, sugar, and Italian seasoning in a frying pan or skillet.  Cook over medium-high heat until the pork is cooked through.  Drain off any excess grease or liquid.
  4. Slice the squash in half lengthwise and hollow it out using a spoon or ice cream scoop.   Chop the squishy squash insides into smaller, bite-sized pieces and set aside.  Place the hollowed out squash shells on a baking sheet and set aside.
  5. Chop the mushrooms and add to the pork mixture along with the squash insides. Continue cooking until the squash and mushrooms are tender.
  6. Add the milk, tahini, and cooked millet to the pork mixture.  Cook a few more minutes until the liquid has thickened slightly.  Add salt to taste.
  7. Spoon the mixture into the hollowed out squash, lightly pack the mixture down as you go.  (I had a lot of extra filling so I piled it as high as I could without it falling all over the pan.)
  8. Sprinkle vegan cheese on top of the stuffed squash (if using).  I thought it tasted great both with and without the cheese.
  9. Bake for 25-30 minutes or until the squash is tender and the tops are slightly browned.  Serve with salad and bread if desired. 

Sunday, November 2, 2014

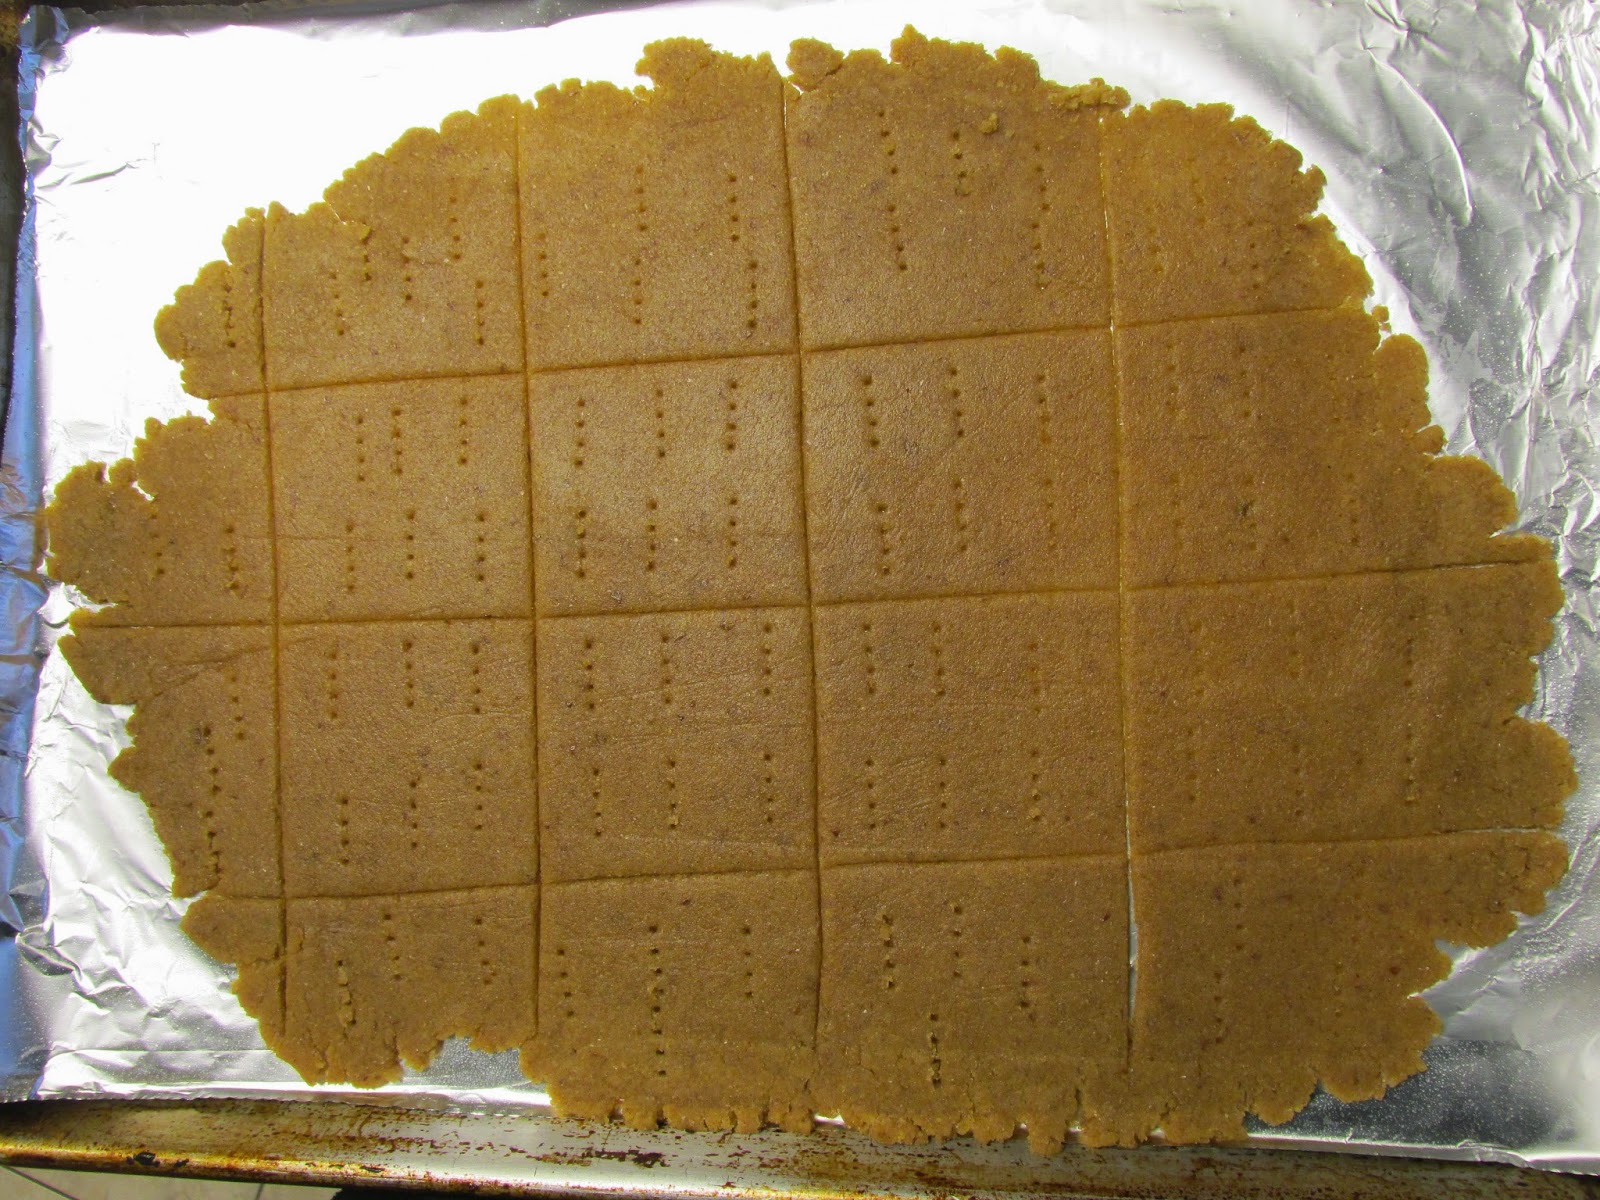
Kamut Graham Crackers

This recipe came about as sort of a necessity.  There is an Oh She Glows vegan pumpkin pie recipe with graham cracker crust that I've wanted to try for like a year now.  However, when you are a single mom with a 6 month old baby that has multiple food allergies, making such things becomes too much of a hassle.  Now I have a 16 month old who LOVES graham crackers and snacks in general.  In fact, she is getting to the point where she has to have snacks to get through the day.  Usually we just have dried fruit or Arrowhead Mills Kamut puffs, but those get old fast, even for a toddler.  Sometimes as a special treat we have plantain, potato, or lentil chips but those are expensive and are not very fulfilling as snacks.  My daughter is also in daycare now that school is back in session, which means she gets to watch all of the other kids have snacks while she has none.  It only seemed right to expand our snack repertoire. 

 I almost never make snacky stuff because it's all I can do to get breakfast, lunch, and dinner on the table, but when she got a hold of a wheat and corn filled graham cracker at daycare the other day, I figured what the heck; why not make some for her and have some for my vegan pumpkin pie recipe as an added bonus. Win, win!

This recipe worked out quite nicely with the Kamut flour and it's pretty easy to make.  I went from start to putting it in the oven in under 20 minutes which is another win since that's about how long I can keep my daughter from going into hysterics because I'm cooking and not giving all of my undivided attention to her.  It ends up being worth it though because these delightful crackers are 100% kid approved.   


These crackers are mildy sweet with a light, airy crunch and they are healthier than your traditional store bought graham crackers, which is yet another win.  I haven't tried it yet, but I'm sure they would also taste great with a glass of non-dairy milk or with some melted chocolate and marshmallows.  I can't wait to try them out on my pumpkin pie recipe.  I'll let you know how that goes.
 
Kamut Graham Crackers
 
Ingredients


½ Tablespoon ground flax seed meal
¼ cup coconut oil
2 Tablespoons maple syrup
2 Tablespoons non-dairy milk
1 ½ Tablespoons water

1 cup Kamut brand flour
3 Tablespoons sugar
¼ teaspoon salt
¼ + 1/8 teaspoon baking soda
½ teaspoon cinnamon
 
 
Directions

  1. Preheat the oven to 350 degrees. 
  2. In a small bowl, combine the flax seed meal, coconut oil, maple syrup, non-dairy milk, and water.  Let sit for a few minutes while the flax meal sets.
  3. In a medium sized bowl, combine the flour, sugar, salt, baking soda, and cinnamon.  Mix well.
  4. Add the wet ingredients to the dry ingredients and mix until there are no dry spots.  The dough should be slightly crumbly but should stick together if you mush it with your hands.
  5. Form the dough into a ball and place on a cookie sheet lined with parchment paper or aluminum foil (I didn't have much success with wax paper).
  6. Place another piece of parchment paper or saran wrap on top of the dough and roll the dough out until it is fairly thin (approximately 1/4- 1/8 of an inch).  The baking soda will make it puff up a bit so rolling it thinner will help make the crackers crunchier. 
  7. Cut the crackers into your desired size and shape using a pizza cutter, cookie cutter or pastry slicer and poke a few fork pricks into each cracker.
  8. Bake the crackers at 350 degrees for 15-20 minutes or until they are golden brown.  The crackers will be slightly spongy when you first pull them out of the oven but they will crisp up as they cool down.
  9. Store the crackers in an air-tight container or zip lock bag to keep them fresh.

Note: If you prefer not to use coconut oil you can sub another oil, preferably a light oil in its place.  You may need to make some adjustments to cooking time and wet to dry ratio, however, to get the same light crisp that the coconut oil provides.

Monday, October 6, 2014

Dairy Free Chicken Alfredo Pizza with Kamut Crust


Ok so I've been totally slacking on the blog for the past several weeks.  It's just been so crazy trying to start a new job, new daycare, a new schedule, and balance regular every day life as we know it.  I've actually been on a soup kick the last several weeks because it's easy and cheap, and there are a ton of great recipes out there.  However, after a month of soup, I find myself craving home made pizza more and more.  This particular one was inspired by Papa Murphy's Chicken Bacon Artichoke DeLite pizza.  Although I usually prefer my pizza loaded up with vegetables, I will always make an exception for the Chicken Bacon Artichoke pizza.  It really is one of the best pizzas ever invented in my opinion.  The whole time I was breastfeeding, I was craving it like crazy.  So I took on the challenge of making a dairy free version that was also safe for my little one to eat.  It actually ended up being a lot easier than I expected.  With an alfredo sauce inspired by a recipe by Angela Liddon, auther of "Oh She Glows," and a pizza crust recipe that my brother brought home from home ec in school (I found that this particular recipe works well with Kamut), I was easily able to create what just might be the greatest dairy free pizza ever.  I made this pizza for my dad and step mom and I think I blew their minds.  They totally weren't expecting a dairy free pizza to taste this good.   It is time consuming to make so I don't make it often, but the finished product is well worth the work.  P.S. sorry about the funky coloring on some of the pictures.  I got caught taking them at an awkward time of day. 


Dairy Free Chicken Alfredo Pizza
 

 For the Kamut Crust
(Makes two 14 inch pizza crusts)

Ingredients:

2 cups warm water
6 teaspoons sugar
2 Tablespoons oil
2 Tablespoons yeast
1 teaspoon salt
4 1/4 cups Kamut flour

Directions:
  1. Preheat oven to 450 degrees
  2. Mix water, sugar, oil, and yeast in a mixing bowl and let sit for a few minutes to activate yeast.
  3. Add the salt and flour and mix until combined.  The dough should be firm but slightly sticky. You may need to add more or less flour to get this consistency. 
  4. Divide the dough in half.  Roll out each half to fit the pan (approximately 14 inches).  You may need to use extra flour or oil as you roll the dough out to keep it from sticking. 
  5. If using a stone pizza pan, sprinkle the pan with a little Kamut flour to prevent the dough from sticking.  If using a regular pan, you can either use flour or spray the pan with oil. 
  6. Place the dough on the pan.  If desired you can fold up the sides for a thicker crust. 
  7. Add sauce and toppings to the pizza.

* For a gluten free option, use gluten free crust of choice

For the Sauce

Ingredients:

6 cloves garlic
1 cup raw cashews (soaked overnight and drained)
2 Tablespoons nutritional yeast
1 Tablespoon + 1 teaspoon tahini
1 Tablespoon lemon juice
1 ½ teaspoons Braggs Amino Acids or Soy Sauce
¼ teaspoon salt
2G Tablespoons almond milk or non-dairy milk of chioce

Directions:
  1. Place the garlic in a food processor and blend until finely minced.
  2. Add the cashews and blend until smooth being careful not to over blend (you do not want cashew butter).
  3. Add the nutritional yeast, tahini, lemon juice, Braggs, salt, and almond milk.  Continue blending until you have a nice creamy consistency.  If the sauce is too thick for your liking, just add a little extra almond milk.
  4. Spread the sauce over the crust and add toppings

Optional Pizza Toppings

Really any toppings would taste great on this pizza, but here is a list of suggestions.

Chicken
Bacon
Mushrooms
Spinach
Green or Red Onions
Zucchini
Tomatoes
Bell Peppers
Vegan Cheese (I used Vegan Gourmet)
Marinated Artichoke Hearts (I used Reese's Grilled Artichoke Hearts because they are free of citric acid)

Any other toppings you would like


Cooking Instructions:

Once the pizza is assembled, bake at 450 degrees for 8-15 minutes or until the crust is golden brown.


Saturday, August 23, 2014

Grain Free Hoppin' John

I actually eat this stuff for breakfast.  The inspiration came from a few sources actually.  The first was my mother who suggested that I start thinking outside the box in terms of breakfast food.  Restrictions on eggs, grains, and dairy left me with few good, quick options in the morning.  This has bacon in it so it totally counts as breakfast.  The second inspiration came from my sort-of southern roots.  I've known about Hoppin' John since I was a kid.  I loved the American Girls series and my parents had gotten me some of the cookbooks for Christmas.  Traditionally it's made with rice, but since that wasn't an option, I decided to add more beans.... plus some veggies and spices.  After living in Virginia for 4 years and then going on an allergen friendly diet, I was actually craving some good old Southern cooking.  Unfortunately in the South, everything gets breaded, fried, dipped in cream, and smothered in butter.  While all of these things make Southern cooking the wonderful cuisine that it is, they are not on the approved allergy list.  That made Hoppin' John, a good option for a blog post.  Just a side note, I'm presently attempting to think up a recipe for fried chicken with Kamut flour and no dairy.  I'll let you know how that works out.  Until then, enjoy some grain-free Hoppin John for breakfast, or lunch, or dinner, or all three.  This dish is both easy to make and budget friendly so you can eat a lot of it and feel great about it because it's good for your body, and your pocketbook.


 Traditionally, Hoppin' John is made with rice.  If you would like to add rice feel free.  Just substitute any amount of beans for an equal amount of rice.  I also use pickled jalapeño.  It adds a great flavor to the dish, and it tends to be a little milder than fresh jalapeño.  It also keeps for long periods of time (we aren't big jalepeno eaters here).  However, I have used fresh jalapeño in a pinch and it came out great.

Grain Free Hoppin' John
Ingredients:
3 slices bacon
1 clove garlic
1 green pepper
1/2 cup onion
1 Tablespoon pickled jalapeño (or fresh)
3 cups black eyed peas (2 cans)
1 cup black beans (1 can)
1/2 teaspoon oregano
1/2 teaspoon thyme
1 teaspoon salt
1 1/2 teaspoons maple syrup
salt and pepper to taste 
Directions:
  1. In a large frying pan, cook the bacon until it is crispy.  Remove from the pan and set aside.
  2. Add the garlic, onion, pepper, jalapeño, oregany, thyme, salt, and maple syrup to the pan and sauté until tender.  I just use the bacon grease to sauté the veggies.  It really enhances the flavor of the whole dish.  However, if you are looking for a leaner option, you can just use a little olive oil. 
  3. Drain off the extra grease.
  4. Add the beans, and heat through.